
Chair Upholstery Lesson 1: Pre-work
4 do’s and Don’ts for your first projects according to Antonia and her 23 years experience making mistakes. We were all told to write down these rules.
Bla Bla Bla, if you are not interested in chair upholstery skip to the bit where I threw the hammer down.
- Do not try to upholster a wingback chair. Why because it is kick ass and you need about 18 months of experience before you attempt this. Start with a dining room chair or foot stall. It has the elements you need to master tension, corners, measuring and cutting. Move on up through headboards, chairs with squabs, padded chairs without arms, simple armchairs with removable wooden arms then your ultimate goal, a wingback chair.
- Do not use stripes or geometric patterns until you know what you are doing. Why because you need to be able to match the pieces perfectly.
- Do not use any other fabric other than upholstery grade. Why because it is stretchy enough to manipulate around corners and provides enough tension for a smooth finish. Upholstery fabric can be cut into release cuts, without it ripping further or tearing at the staple sites. Other fabrics, even drapery will not do this. It is false economy.
- Do not start on a complete re-upholstery project, i.e taking a chair down to the frame. Why because you need to build experience with the fabric first. Choose a chair that has good bones, where you can use the existing springs and padding.


4 Do’s before you start
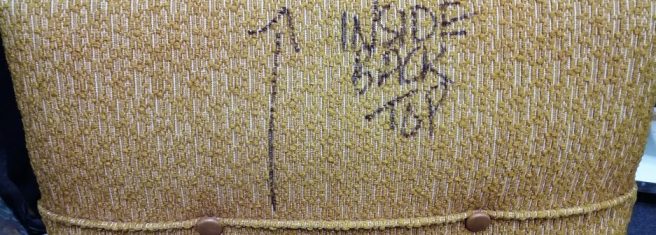
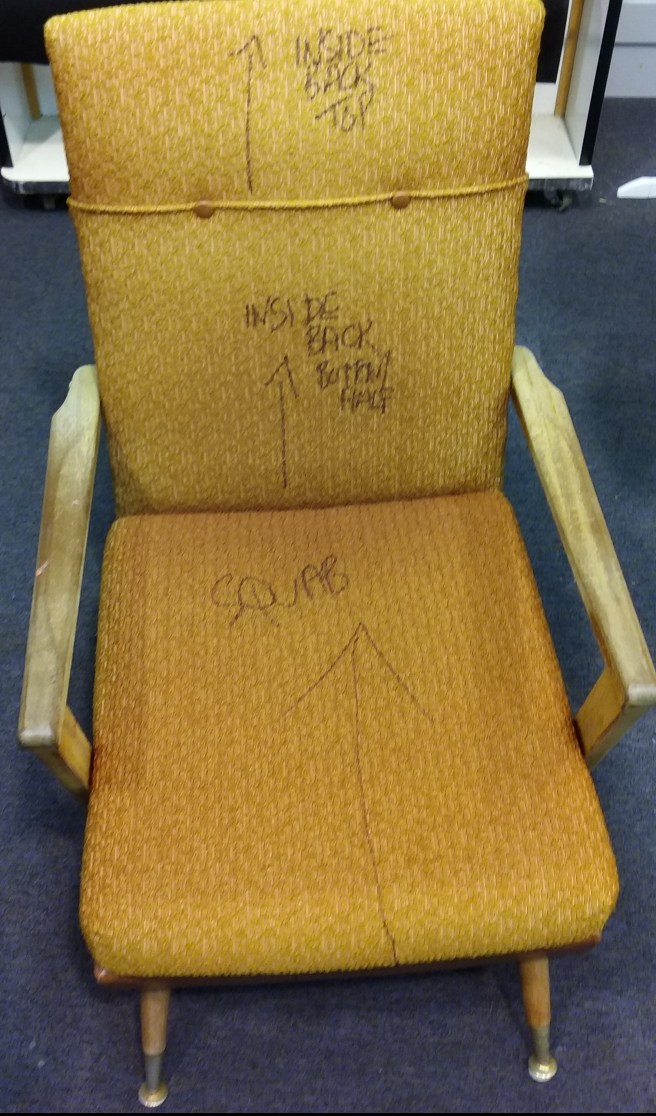
- Do label all parts with directional arrows before striping the chair. Make sure the arrows all point the same way, UP from the ground. Use abbreviations S = seat OB = outside back etc.
- Do measure each piece whilst it is on the chair to work out how much fabric you need. Some fabric will stretch to fit.
- Do take lots of photos. Record every angle, detail every fold, corner and crease. Walk around the chair taking pictures, then walk around again.
- Do practice as much as possible.


We all dutifully wrote our lists, laughed and listened to all our chair Gods advice. I have tried to capture some quips with the rules. She has made many mistakes over the years and was very keen that we all learn from them. We all promised to remember the 4 do’s and don’ts, even though I can guarantee that we all just wanted to grab the toolkit sitting on our tables and rip everything off our little chairs with abandon.
So this is the practice part of the lesson, I fist pumped internally. You all have a toolkit in front of you I want you to have a look through. You will need:
- A slot or flat head screwdriver
- a tape measure
- pins
- chalk or a marker
- a small hammer
- pliers or better still wire cutters
- good scissors
- and a staple gun
Now, everyone find your markers we are going to mark our chairs.
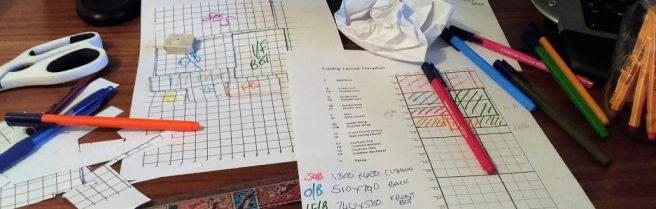
We went on to mark and measure each piece, including allowances for any material that disappeared out of sight. We then entered the figures on a layout grid to work out fabric, starting with the larges piece. We all took hundreds of photos and were sent home to strip off the fabric and work on any woodwork. Yay homework.
This is the example
")
")
This is the reality. Nearly an hour of brain bruising additions and subtractions. The result, six pieces of scrunched up paper, Grrrrrr!!!! In the end, I made my own grid, 1cm to 1m, cut out the pieces and moved them around until they fitted. Old school and no maths needed. It was all getting a bit too much.
I have learnt, when striping down you must do it in reverse order. We were told to think about how the Upholster had worked by looking at the layers.
I threw the hammer down right about here.
I will tell you now they were not thinking about the person who would need to re upholster this chair 60 years later. Just when I thought I had the last staple out another fold of fabric would reveal a neat row of 20!
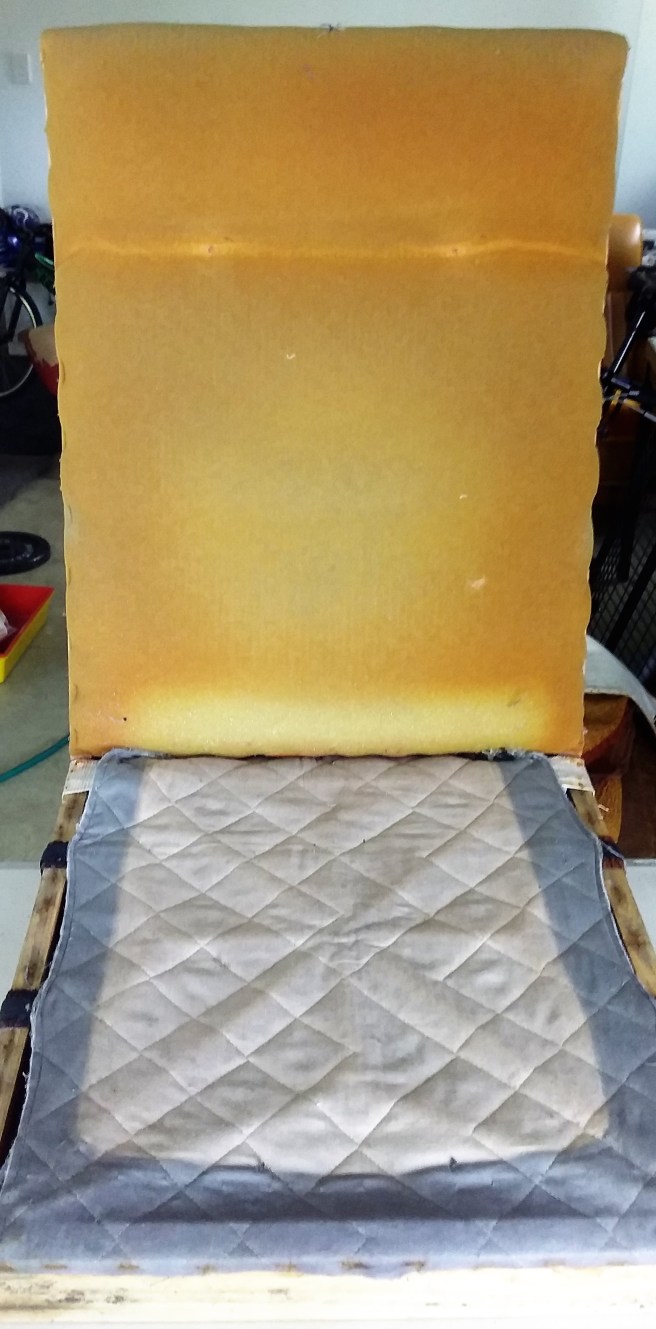
Usually, you remove the dust cover first then, outside back, inside back, base, cushion. This really is a slow and thoughtful process. As you are striping your chair you should be thinking of how the pieces will be reapplied and again take lots of pictures. Use the screwdriver and hammer to get under the staples then twist and pop one side off. Pull the other side off with the pliers turning into where the middle of the staple would have been. This stops any breakage. Theory only. Tacks have to be prised out with hammer and screwdriver too. Remove any legs and arms but leave any padding that is in good condition.
")

")
")
The whole process took me over four hours. I had bargained on less than an hour. I have much to learn! I wrestled with rusty screws that did not come out, I had to saw drill, hammer and in the end, invest in a special tool to get the arm screws out. My husband came down to see what all the fuss was about, saw my face and walked away silently.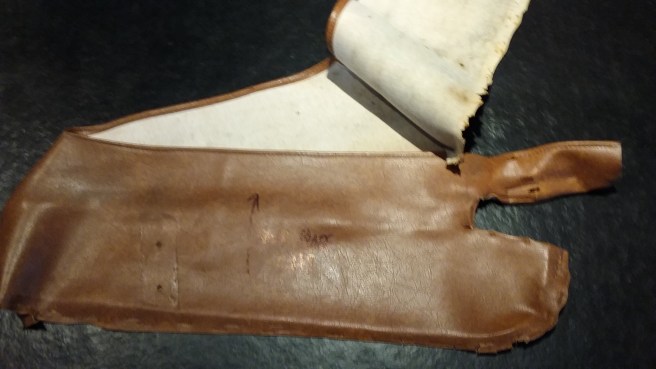
Warning, above is one of the pieces that ‘disappeared’ when I was measuring on the chair. All that careful removing made a difference. I was able to take the pieces off almost perfectly and adjusted my measurements for this section. Without this lesson I would have hacked it all off and been left short of fabric.

I faced an infuriating amount of tacks and staples. Yucky old padding that disintegrated to dust just as I was inhaling and framing that splintered and fell apart. I swore a lot and threw my hammer down but the staples just sat there smiling. This is not an easy or cheap thing to do. I now have a very nude chair and a pile of wooden bits that resemble Jenga. The old rabbit glue could not withstand my manic pushing and pulling, pieces just fell off! Haha. Yep no idea.
ALWAYS WEAR SAFETY GOOGLES, those staples can ping out.

Next week, structure. I get to use the air gun stapler thing!!!! I’ll let you know how it goes.


I know exactly how you feel, that is why my chairs are all partially done…good luck. May the force be with you.
LikeLike
Oh wow, I am impressed you said chairs
LikeLike
There are 4 at my house and a big beautiful wooden framed couch at our cabin…I did make new cushions for the couch.
LikeLiked by 1 person